我们知道Spring中为我们对域模型的操作提供了和多的接口。例如 CrudRepository 接口提供了复杂的CRUD功能来管理实体类。
CrudRepository 让我们来看一下CrudRepository 接口都为我们提供了什么常用的功能吧!1
2
3
4
5
6
7
8
9
10
11
12
13
<S extends T> S save(S var1);
<S extends T> Iterable<S> save(Iterable<S> var1); //保存实体
T findOne(ID var1); //返回id为var1的实体
boolean exists(ID var1); //判断id为var1的实体是否存在
Iterable<T> findAll(); //取出所有实体
void delete(ID var1); //删除id为var1的实体
// … more functionality omitted.
Query creation create Entity and declare interface Repository scr/main/java/com.mengyunzhi/Repository
Entity
1
2
3
4
5
6
7
8
9
10
11
12
13
14
15
16
17
18
19
20
21
22
23
24
25
26
27
28
29
30
31
32
33
34
35
36
37
38
39
40
41
42
43
44
45
46
47
48
49
50
51
52
53
54
@Entity
class Person {
@Id @GeneratedValue(strategy = GenerationType.AUTO)
private Long id;
private String emailAddress;
private String lastName;
private String firstName;
public Person(String emailAddress, String lastName, String firstName) {
this.emailAddress = emailAddress;
this.lastName = lastName;
this.firstName = firstName;
}
public Person(String lastName, String firstName) {
this.lastName = lastName;
this.firstName = firstName;
}
public Person() {
}
public Long getId() {
return id;
}
public void setId(Long id) {
this.id = id;
}
public String getEmailAddress() {
return emailAddress;
}
public void setEmailAddress(String emailAddress) {
this.emailAddress = emailAddress;
}
public String getLastName() {
return lastName;
}
public void setLastName(String lastName) {
this.lastName = lastName;
}
public String getFirstName() {
return firstName;
}
public void setFirstName(String firstName) {
this.firstName = firstName;
}
}
Query creation Spring Data repository infrastructure 内置的查询生成机制对于建立实体的约束查询是很有用的。此机制的方法带有 find...By, read...By, query...By, count...By, get...By的前缀并且Spring将会自动解析其余的部分,也就是解析…部分。 你可以对实体的多个属性进行同时查询并用 And和 Or连接起来。
Example
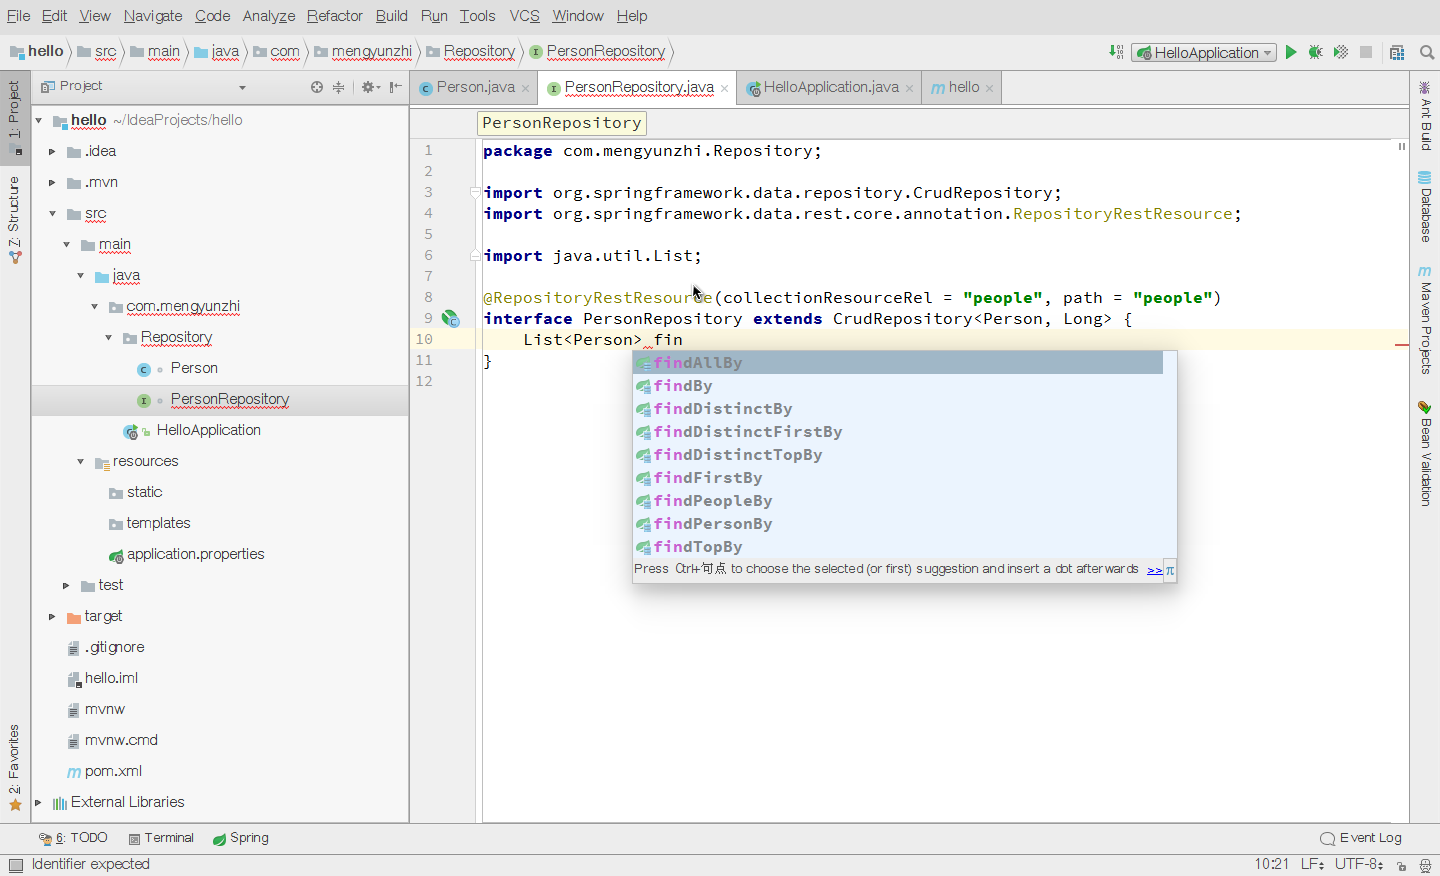
当我们写方法的时候,会惊喜的发现Spring竟然能够自动补全我们还没有写的方法。这是不是很神奇呢!
1
2
3
4
5
6
7
8
9
10
11
12
@RepositoryRestResource(collectionResourceRel = "people", path = "people")
interface PersonRepository extends CrudRepository<Person, Long> {
//按lastname查询
List<Person> findByLastName(String lastname);
//按lastname或者firstname查询
List<Person> findByLastNameOrderByFirstName( String lastname, String firstname);
//为查询启用静态排序
List<Person> findByLastNameOrderByFirstNameAsc(String lastname);
}
test the Query 如果你对Spring实现 REST不熟悉的话,那请读一下上一篇文 章吧!
保存实体 终端输入命令:$ curl -i -X POST -H "Content-Type:application/json" -d '{"firstName":"Frodo","lastName":"Baggins","emailAddress":"mengynzhi@yunzhiclub"}' http://localhost:8080/people
1
2
3
4
5
6
7
8
9
10
11
12
13
14
15
16
17
18
19
$ curl -i -X POST -H "Content-Type:application/json" -d '{ "firstName" : "Frodo", "lastName" : "Baggins" , "emailAddress": "mengynzhi@yunzhiclub" }' http://localhost:8080/people
HTTP/1.1 201
Location: http://localhost:8080/people/1
Content-Type: application/hal+json;charset=UTF-8
Transfer-Encoding: chunked
Date: Sun, 28 May 2017 08:22:18 GMT
{
"emailAddress" : "mengynzhi@yunzhiclub",
"lastName" : "Baggins",
"firstName" : "Frodo",
"_links" : {
"self" : {
"href" : "http://localhost:8080/people/1"
},
"person" : {
"href" : "http://localhost:8080/people/1"
}
}
发现保存成功了。
我们在终端输入 $ curl http://localhost:80801
2
3
4
5
6
7
8
9
10
11
$ curl http://localhost:8080
{
"_links" : {
"people" : {
"href" : "http://localhost:8080/people"
},
"profile" : {
"href" : "http://localhost:8080/profile"
}
}
}
同上,继续输入命令 $ curl http://localhost:8080/people/search1
2
3
4
5
6
7
8
9
10
11
12
13
14
15
16
17
18
19
20
$ curl http://localhost:8080/people/search
{
"_links" : {
"findByLastName" : {
"href" : "http://localhost:8080/people/search/findByLastName",
"templated" : true
},
"findByLastNameOrderByFirstNameAsc" : {
"href" : "http://localhost:8080/people/search/findByLastNameOrderByFirstNameAsc",
"templated" : true
},
"findByLastNameOrderByFirstName" : {
"href" : "http://localhost:8080/people/search/findByLastNameOrderByFirstName",
"templated" : true
},
"self" : {
"href" : "http://localhost:8080/people/search"
}
}
}
然后让我们测试第一个方法吧!$ curl http://localhost:8080/people/search/findByLastNameAndFirstName1
2
$ curl http://localhost:8080/people/search/findByLastNameAndFirstName
{"cause":null,"message":"Unable to detect parameter names for query method com.mengyunzhi.Repository.PersonRepository.findByLastNameAndFirstNameAllIgnoreCase! Use @Param or compile with -parameters on JDK 8."}
然后我们会发现报错了,查看错误信息。因为我们需要用ajax来请求这些方法,错误信息告诉我们需要给我们函数加 @Param这个注解,我们对代码进行修改
修改PersonRepository 1
2
3
4
5
6
7
8
9
10
11
12
13
@RepositoryRestResource(collectionResourceRel = "people", path = "people")
interface PersonRepository extends CrudRepository<Person, Long> {
//按lastname查询
List<Person> findByLastName(@Param("lastname") String lastname);
//按lastname或者firstname查询
List<Person> findByLastNameOrderByFirstName(@Param("lastname") String lastname,
@Param("firstname") String firstname);
//为查询启用静态排序
List<Person> findByLastNameOrderByFirstNameAsc(@Param("lastname") String lastname);
}
test continue 终端输入命令:http://localhost:8080/people/search/findByLastName?lastname=Baggins
1
2
3
4
5
6
7
8
9
10
11
12
13
14
15
16
17
18
19
20
21
22
{
"_embedded" : {
"people" : [ {
"emailAddress" : "mengynzhi@yunzhiclub",
"lastName" : "Baggins",
"firstName" : "Frodo",
"_links" : {
"self" : {
"href" : "http://localhost:8080/people/1"
},
"person" : {
"href" : "http://localhost:8080/people/1"
}
}
} ]
},
"_links" : {
"self" : {
"href" : "http://localhost:8080/people/search/findByLastName?lastname=Baggins"
}
}
}
还剩下两个让我们自己练习一下吧!
Code download 参考文章 Spring Data JPA - Reference Documentation Spring Documents